Pages

Showing posts with label baking. Show all posts

Tuesday, 15 December 2015

My macaron obsession continues x


A little tradition my mum and I have is to buy the christmas edition of the Donna Hay magazine, I immediately flip to the dessert section and mum loves looking for meal ideas. Anyway this years christmas edition had a really easy chocolate macaron recipe, and I couldn't resist making some Macarons. They were super easy to make and taste ridiculously good, the little bit of salt on top really perfects the flavour. Once they were ready I put them in a pretty jar next to our vase of peonies (aren't peonies the best!!).
I can't believe that Christmas is next Friday!Let me know what little baking traditions do you have. xx


Friday, 11 December 2015

More Easy Christmas Hearts! ♥︎ | Blogmas Day 12!!!


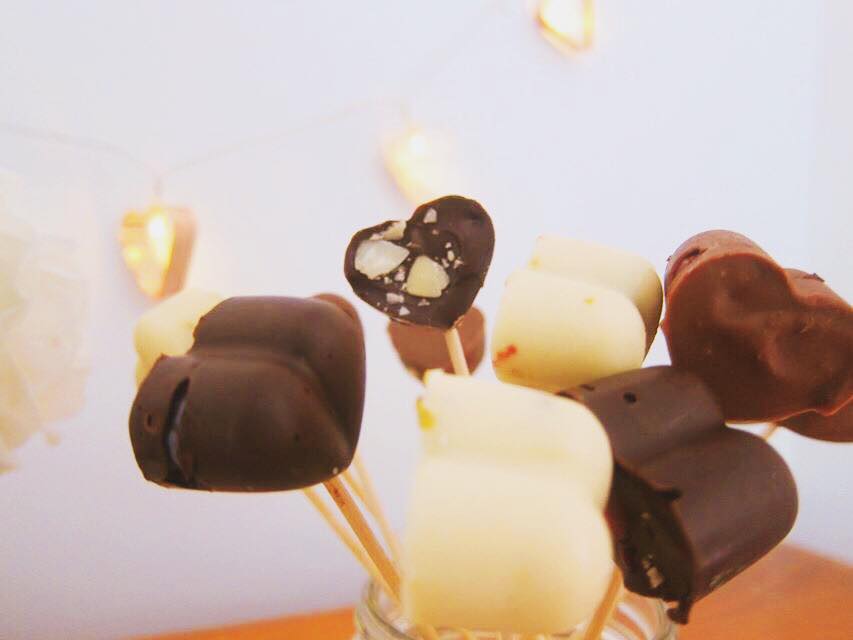
Okay, so remember like a week ago I showed you how to make christmassy hearts? Well I got creative and made dark choc and milk chic versions for all the white chocolate haters. Then I saw a pic of cake pops and thought, omg these would look amazing on skewers! Just imagine these on a dessert table at a party, wouldn't they look adorable? 
Anyway so for the dark choc ones I put blueberries and sliced almonds in the middle.
And for the milk chocolate ones i filled them with red currents, but you can put in them whatever tickles your fancy! Then after like half an hour I took them out of the freezer, they were soft, but still hard enough to hold their shape. I then skewered them, but don't put the skewer too far in cause they tend to start to break. Then put them back in the freezer, or eat them then hah.
I think raspberries would be amaze in like the milk chocolate ones, raspberry and chocolate is such a perfect combo, like I think only Nutella and strawberries can beat it! 
Hope this post inspired you a little, I had loads of fun making and sharing these with you! 
Love ya! xx 


Thursday, 10 December 2015

DIY Gift Idea- Festive Truffles ✔️ | Blogmas Day Ten

Hey lovelies! Who has all their Christmas shopping done? I haven't, but whatev's it'll happen haha. As I'm sure all of you know a money saving way of giving gifts is baking something cute. The other week I showed you how to make cute christmas hearts, well this week I thought I'd show you how to style a truffles in a festive way. 
So the truffles I made are from Butterscotch Truffles and the recipe is from the 2015 christmas edition of Donna Hay's magazine. Mine may not look quite as perfect as hers but they still taste pretty damn good. Like ridiculously good. 


Okay so when giving little treats like these jars are ideal so you can see what's inside. I chose a rounded jam jar. It's not too big, but big enough to fit 4-5 balls. I also filled the jar with some red currents to add a pop of colour and give it a christmassy feel. It looks super cute with a label tied around the lid. I chose black chalkboard labels  which I picked up from shiploads for like a dollar. If you want to bring the truffles to a party they look amazing in a triangular shape with red currents and leaves placed around and on the truffles. 

Let me know what DIY gift you like to give below! xx 

Thursday, 3 December 2015

The BEST Christmas Cupcakes ✖️ | Blogmas Day Three


I told my self that I wouldn't do another baking blog this week, but then these happened and I couldn't wait to share, so sorry past me. Basically these christmas explosions are just simple cream cheese cupcakes with gingerbread biscuits, but don't let their simplicity fool you. Their deliciousness is off the chart! So each aspect off this creation is quite easy to make, but it does just take a little while as there are a fair few elements to create. BUT there is no doubt that even the worst cook can make these tasty treats! xx 


You're gonna wanna make the cupcakes first so here is the recipe:

➳ Cupcake Ingredients
90g softened butter
90g softened cream cheese
2 tsp of finely grated lemon rind
2 eggs
1/3 cup self-raising flour
1/2 cup plain flour
Makes 12

➳ Frosting Ingredients 
30g softened butter
80g softened cream cheese
1 tsp lemon juice
1 1/2 cups icing sugar

➳ One 
Preheat oven to 180 degrees celsius and line a cupcake tray with red and white patties. 

➳ Two 
Beat butter, cheese, rind and eggs until light and fluffy. 

Three
Add sifted flours to mix and beat until just combined. Divide mixture among the patties so each one is two thirds full. 

➳ Four
Bake for approximately 25 minutes or until cooked, then place cupcakes on a cooling rack. 

➳ Five
 Spread frosting over cooled cupcakes. 

➳ Cream Cheese Frosting 
Beat butter, cheese and lemon until light and fluffy then add the sifted icing sugar and mix until combined.


Next comes the gingerbread biscuits! I actually make these while the cupcakes are cooking/cooling, just to save on a bit of time, but whatever! xx

➳ Gingerbread Ingredients:
75g of brown sugar
2 tbs of golden syrup
1 tbs of black treacle
1tbs of water
1 tsp of cinnamon
1 tsp of ginger 
95g of butter softened 
1/2 tsp of bicarbonate of soda
225g of plain, sifted flour 
Makes approx. 24

➳ One 
Put the sugar, golden syrup, treacle, water, cinnamon and ginger in a medium saucepan on a low heat. Use a wooden spoon to stir until combined.

➳ Two 
Add the softened butter to the saucepan and mix until combined.

➳ Three 
Add the bicarbonate of soda to the mix and stir until combined. The mixture should start to turn from a dark brown to a light brown at this stage. This is how you will know that the bicarb has dissolved. The mixture should not bubble at all during these steps.

➳ Four 
Take the saucepan off the heat and gradually add the flour. Stirring it in with each addition. The mixture should for a dough at this stage.

➳ Five 
Take the dough and place it in a bowl and let it cool for 30 minutes.

➳ Six 
After the dough has cooled down a bit it's time to roll it out and cut out shapes. This is also the time to set the oven to 180 degrees Celsius.
Make sure you knead the dough slightly on a cool surface before rolling it out on a floured surface. Kneading it helps to cool the dough down that extra bit and makes it easier to roll it out.
The dough should be about 3mm thick, so it's not too thick but still keeps its shape.

➳ Seven 
Once you've cut out your shapes and placed the on tray lined with baking paper they're ready to go in the oven for about 15 minutes or until they are lightly golden and firm to touch. I always check the frequently after the 10 minute mark to ensure they don't burn. Once they are out of the oven, move the biscuits to a cooling rack. 

➳ Eight 
Once they're cool, they're ready to be iced, I was feeling lazy and iced mine with store bought decorating icing, but royal icing works better if you wanna put in the extra little bit of effort. 
Let the icing set for a few minutes then stick them into your iced cupcakes. You just need to push 'em in until they're stuck there haha. I found it easier to put them on a bit of an angle. I mainly used trees on my cupcakes cause it looks a bit like a tree half buried under snow, but use what ever shapes tickle your fancy. Be creative and have fun! 


Happy Holidays, and I hope you enjoy making them as much as I did! xx 


Monday, 30 November 2015

Easy Christmas Hearts ❤ | Blogmas Day One


Hello lovelies, here is my first Blogmas post as promised because IT'S THE FIRST OF DECEMBER! EEEEEK!!! 
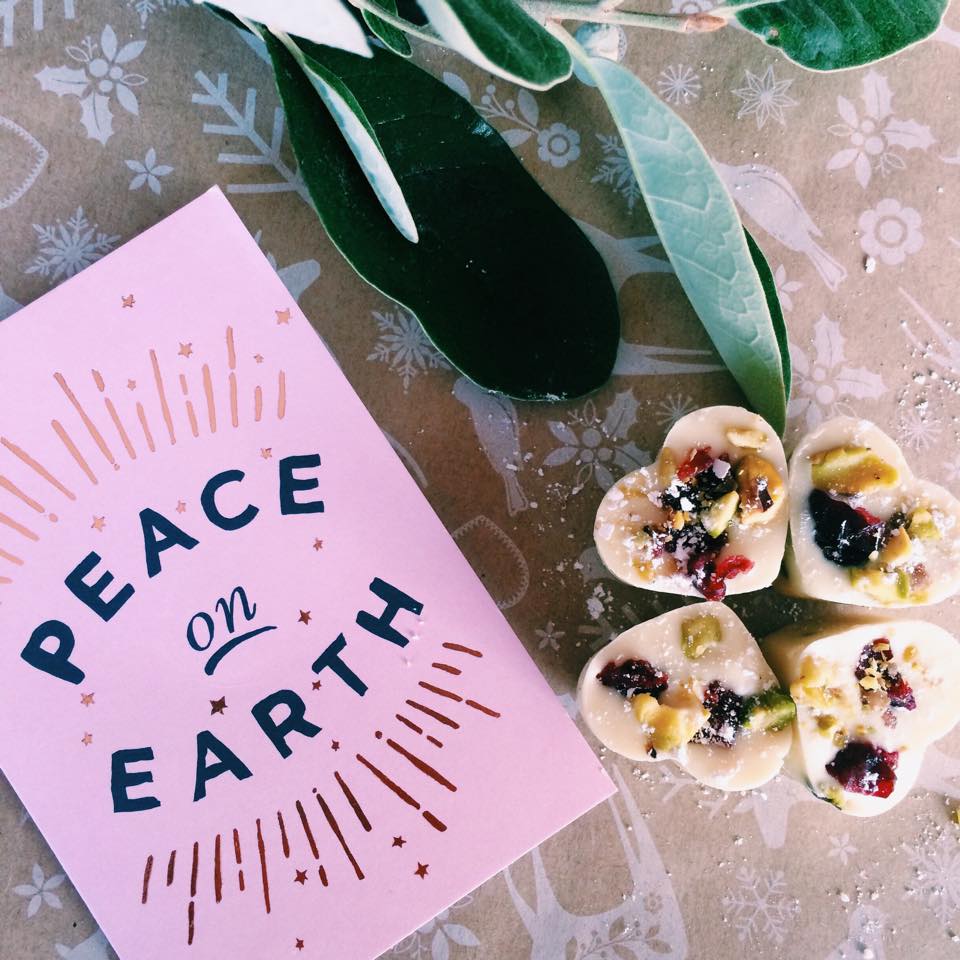
So today I'm going to show you how to make these super cute Christmas Hearts, they literally take like ten minutes to make. Okay, so all you need is;

➳  One block of White Chocolate (this should be enough for 12 hearts x)
➳  A handful of dried Cranberries, roughly chopped
 A handful of crushed pistachio's
➳ And a heart shaped silicone mould tray (I got mine from Kmart for like $7ish)

All you need to do is melt the chocolate and then put it in either a piping bag or a small jug with a lip. Fill the silicone hearts half way then add a couple of bits of cranberry and pistachio to the hearts. Fill them with more chocolate to just below the top, then add some more cranberries and pistachio bits. Put in the freezer for like an hour, it will take less time than this but putting them in for a full hour just makes sure that they are definitely solid. 
Once the hour is up you can take them out of their moulds and voila! they're ready for eating. 
I think these are perfect to give to your friends or your mum/sister/grandma, just be sure to keep them in the fridge whenever possible so they don't melt! hah!
If you don't have silicone moulds of any shape simply spread the melted chocolate over a baking paper lined tray and top with the cranberries and pistachio's. Once it had hardened, you can then break it up into lots of pieces, don't worry they will still look cool and taste the same. 
If you make any be sure to tag me (@rach_oneill) in your instagrams so I can give it a cheeky like ;) 
Merry Christmas lovelies xx 


Tuesday, 24 March 2015

Easy Nutella and Strawberry Macarons


Hello I hope you are all enjoying the autumn weather or spring weather if you're on the opposite side of the world, can't say I am! I want summer back... Anyway after the randomly rainy weather forced me inside yesterday I figured what better way to spend the day than making macarons? I'm a sucker for macarons and this recipe is super easy and creates a light and tasty treat. 
If you decide to try it out and post it on Instagram or Twitter make sure to tag me. My username for both is @rach_oneill 

Ingredients |


 3 egg whites

 2 cups of icing sugar 
 1 cup of almond flour/meal
 1/4 cup of caster sugar 
 1/4 tsp of cream of tarter
 Food colouring (optional)


Method |

~ Sift icing sugar and almond flour into a medium bowl then mix.

~ Whisk eggs in a separate bowl with an electric mixer until soft peaks form.

~ Add cream of tarter to egg mix and combine.

~ Add caster sugar to egg mix and combine.

~ If you wish to add food colouring add the desired colour to the egg mix and combine.

~ Fold the egg mix into the flour mix until completely incorporated.

~ Pipe the mixture onto a baking tray in circles about 3cm in diameter.

~ Preheat oven to 150 degrees Celsius

~ Bang the trays slightly to let any air bubbles come to the surface, then let macarons stand for 30 minutes. This allows the macrons to become firmer before baking them. You should be able to touch the macarons without the mix sticking to you.

~ Transfer macron shells to the oven and bake for 15-20 minutes or until the shells harden.

~ Pour two teaspoons of cool water under the baking paper and allow the macaron shells to stand for about 5 mins before transferring them to a cooling rack. The cool water creates steam that helps unstick the macrons from the paper.


~ Fill the macrons with nutella and fresh strawberries just before serving. The strawberries can make the macron go soggy if left in the macaron too long.


Best of luck in your baking endeavours! 

Friday, 27 February 2015

Gold Love Cupcakes


Hello lovelies!

Not too long ago my mother asked me to make her some Nutella and strawberry macarons for a bridal workshop she was running and in return she gave me the most beautiful cake stand, which I had been eyeing off for some time.

Unfortunately life got in the way and today was the first opportunity I had to make something to put on it. As I had some lovely gold cupcake patty's (patty's doesn't seem like a pretty enough word for them, but oh well) I decided to make cupcakes.
I used Cupcake Gemma's recipe to make (not so red, but ridiculously tasty) red velvet cakes- you can watch it here!

And without further ado, here are the results! x


If you want to know how i made these delicious macarons click here x


I just love the look of these so much and I think this would be perfect for a gold or a Gatsby themed party! Hope you liked my photos and I hope this inspires you to jazz things up every now and again.
-Rachael xx